
Azure File Sync
- 12 minsINTRODUCTION
Azure provides a how-to guide for deploying Azure File Sync in their technical documentation here: Product Directory -> Azure -> Storage -> Deploy Azure File Sync
I was curious to see what this would look like, so I decided to set this up in my test lab and run through the process my self. I documented the steps below.
WHAT IS AZURE FILE SYNC?
Simply put, Azure File Sync allows you to extend your on-premise file share into Azure. By choosing Azure File Sync, you expand your storage capacity and provide redundancy in the cloud.
REQUIREMENTS
- OS: Windows Server 2012 R2 or later.
- Memory: 2GB of Ram or More
- Patches: Latest Windows patches applied
- Storage: Locally attached volume formatted in the NTFS file format. Remote storage connected by USB isn’t supported.
SUPPORTED PROTOCOLS
- SMB, NFS, or FTPS (any supported file sharing protocol that Windows Server supports)
IMPORTANT TERMINOLOGY
Azure outline’s the following terms you will need to understand to use Azure File Sync:
- Storage Sync Service is the high-level Azure resource for Azure File Sync. The service is a peer of the storage account, and it can also be deployed to Azure resource groups.
- A sync group outlines the replication topology for a set of files or folders. All endpoints located in the same sync group are kept in sync with each other. If you have different sets of files that must be in sync and managed with Azure File Sync, you would create two sync groups and different endpoints.
- A registered server represents the trust relationship between the on-premises server and the Storage Sync Service. You can register multiple servers to the Storage Sync Service. But a server can be registered with only one Storage Sync Service at a time.
- Azure File Sync agent is a downloadable package that enables Windows Server to be synced with an Azure file share. The agent has three components: FileSyncSvc.exe Service that monitors changes on endpoints. The StorageSync.sys. Azure file system filter driver, and the PowerShell management cmdlets.
- A server endpoint represents a specific location on a registered server, like a folder on a local disk. Multiple server endpoints can exist on the same volume if their paths don’t overlap.
- The cloud endpoint is the Azure file share that’s part of a sync group. The whole file share syncs and can be a member of only one cloud endpoint. An Azure file share can be a member of only one sync group at a time.
- Cloud tiering is an optional feature of Azure File Sync that allows frequently accessed files to be cached locally on the server. Files are cached or tiered according to the cloud tiering policy you create.
HOW DOES AZURE FILE SYNC WORK?
Now that we know the requirements, the supported protocols, and understand the important terminology, we are fully prepared to dive into the Azure File Sync deployment process.
DEPLOYMENT PROCESS OVERVIEW
- Evaluation of your on-premise system.
- Create File Sync Resources. You will need a storage account to contain a file share, Storage Sync Service, and sync group. Create the resources in that order.
- Install the Azure File Sync Agent. Install this on each file server taking part in replication to the Storage Sync Service.
- Register the Windows Server computer with the Storage Sync Service.
- Create the server endpoint.
- Verify files are syncing.
TIME TO IMPLEMENT: 2 HOURS
SETUP WINDOWS SERVER VM IN AZURE
Normally, Azure File Sync Service is installed on an on-premise server. Since I tested this completely in my lab environment, I decided to set up my own Virtual Network in Azure and spin up a Windows Server VM that sits inside this network. Skip this part if you already have an on-prem windows server.
Setting up a Windows Server VM in Azure is easiest to do with PowerShell (tip: install w/ Homebrew here if you are on macOS).
Complete the following steps to setup a VNET/Windows Server VM in Azure:
- Open PowerShell and type az login
- After you authenticate to Azure Cloud, create a resource group by running the following command:
- PowerShell will confirm the resource group has been created by providing "ProvisioningState : Succeeded" output as noted in the screenshot below. After confirming this proceed to the next step.
- Create a Virtual Network (operations-sync-vnet) along with a subnet (operation-sync-subnet) with the following command (no PowerShell output for confirmation):
- Enter the following command to create user credentials:
- Choose a username and password for the Windows Server VM.
- Create the Windows Server VM by running the following command:

$resourceGroup = 'operations-file-sync-rg'
$location = 'EastUS'
New-AzResourceGroup -Name $resourceGroup -Location $location

$subnetConfig = New-AzVirtualNetworkSubnetConfig `
-Name operation-sync-subnet `
-AddressPrefix 10.0.0.0/24

$virtualNetwork = New-AzVirtualNetwork `
-Name operations-sync-vnet `
-AddressPrefix 10.0.0.0/16 `
-Location $location `
-ResourceGroupName $resourceGroup `
-Subnet $subnetConfig

$cred = Get-Credential

New-Azvm `
 -Name FileServerLocal `
 -Credential $cred `
 -ResourceGroupName $resourceGroup `
 -Size Standard_DS1_v2 `
 -VirtualNetworkName operations-sync-vnet `
 -SubnetName operation-sync-subnet `
 -Image "MicrosoftWindowsServer:WindowsServer:2019-Datacenter-with-Containers:latest"


NOTE: Before closing this out I made sure to tag the resource group – I always tag my resources in order to keep everything organized. I recommend getting in the habit of tagging resources whenever you create them. This will help tremendously when it comes time for reporting. I ran the following command from PowerShell to tag my new operations-file-sync-rg with 2 name-value pairs, as noted in the command and screenshot below.
$tags = @{"Department"="Operations"; "Environment"="Test"}
$resourceGroup = Get-AzResourceGroup -Name operations-file-sync-rg
New-AzTag -ResourceId $resourceGroup.ResourceId -tag $tags
After this, I double checked a couple things in Azure Portal. I verified my LocalServerServer was added to the appropriate VNET/Subnet, and also added some tags to the resource while in the portal

EVALUATION OF YOUR ON PREMISE SYSTEM
Install the Azure PowerShell Modules
- From the Windows Server VM, I right clicked Start, and selected Windows PowerShell (Admin).
- In the console, download the latest Azure PowerShell modules.
- Enter Y when prompted to accept any untrusted repositories.
Install-Module -Name Az
Complete an Assessment
- Complete a system and data file check by running the following command:
- Confirm the validation is successful:
- Save the results to a .csv file:
Invoke-AzStorageSyncCompatibilityCheck -Path D:\CADFolder
Environment validation results:

Computer name: localhost
OS version check: Passed.
File system check: Passed.

Namespace validation results:

Path: C:\CADFolder
Number of files scanned: 4
Number of directories scanned:

There were no compatibility issues found with your files.
$results=Invoke-AzStorageSyncCompatibilityCheck -Path D:\CADFolder
$results | Select-Object -Property Type, Path, Level, Description | Export-Csv -Path D:\assessment-results.csv
CREATE FILE SYNC RESOURCES
Now that we have verified our Windows Server supports Azure File Sync, we are prepared to create our File Sync resources in the Azure Portal. It is important to create the resources in the following order:
- Storage Account (the storage account is used to store the file share).
- File Share. The file share is the cloud version of the normal on-premise file share, storing all files and folders.
- Storage Sync Service.The Storage Sync Service is responsible for establishing trust between your company’s server and Azure.
- Sync Group. The sync group must contain one cloud endpoint that represents an Azure file share and one or more server endpoints that map to a path on a registered Windows file server.
Create the Storage Account
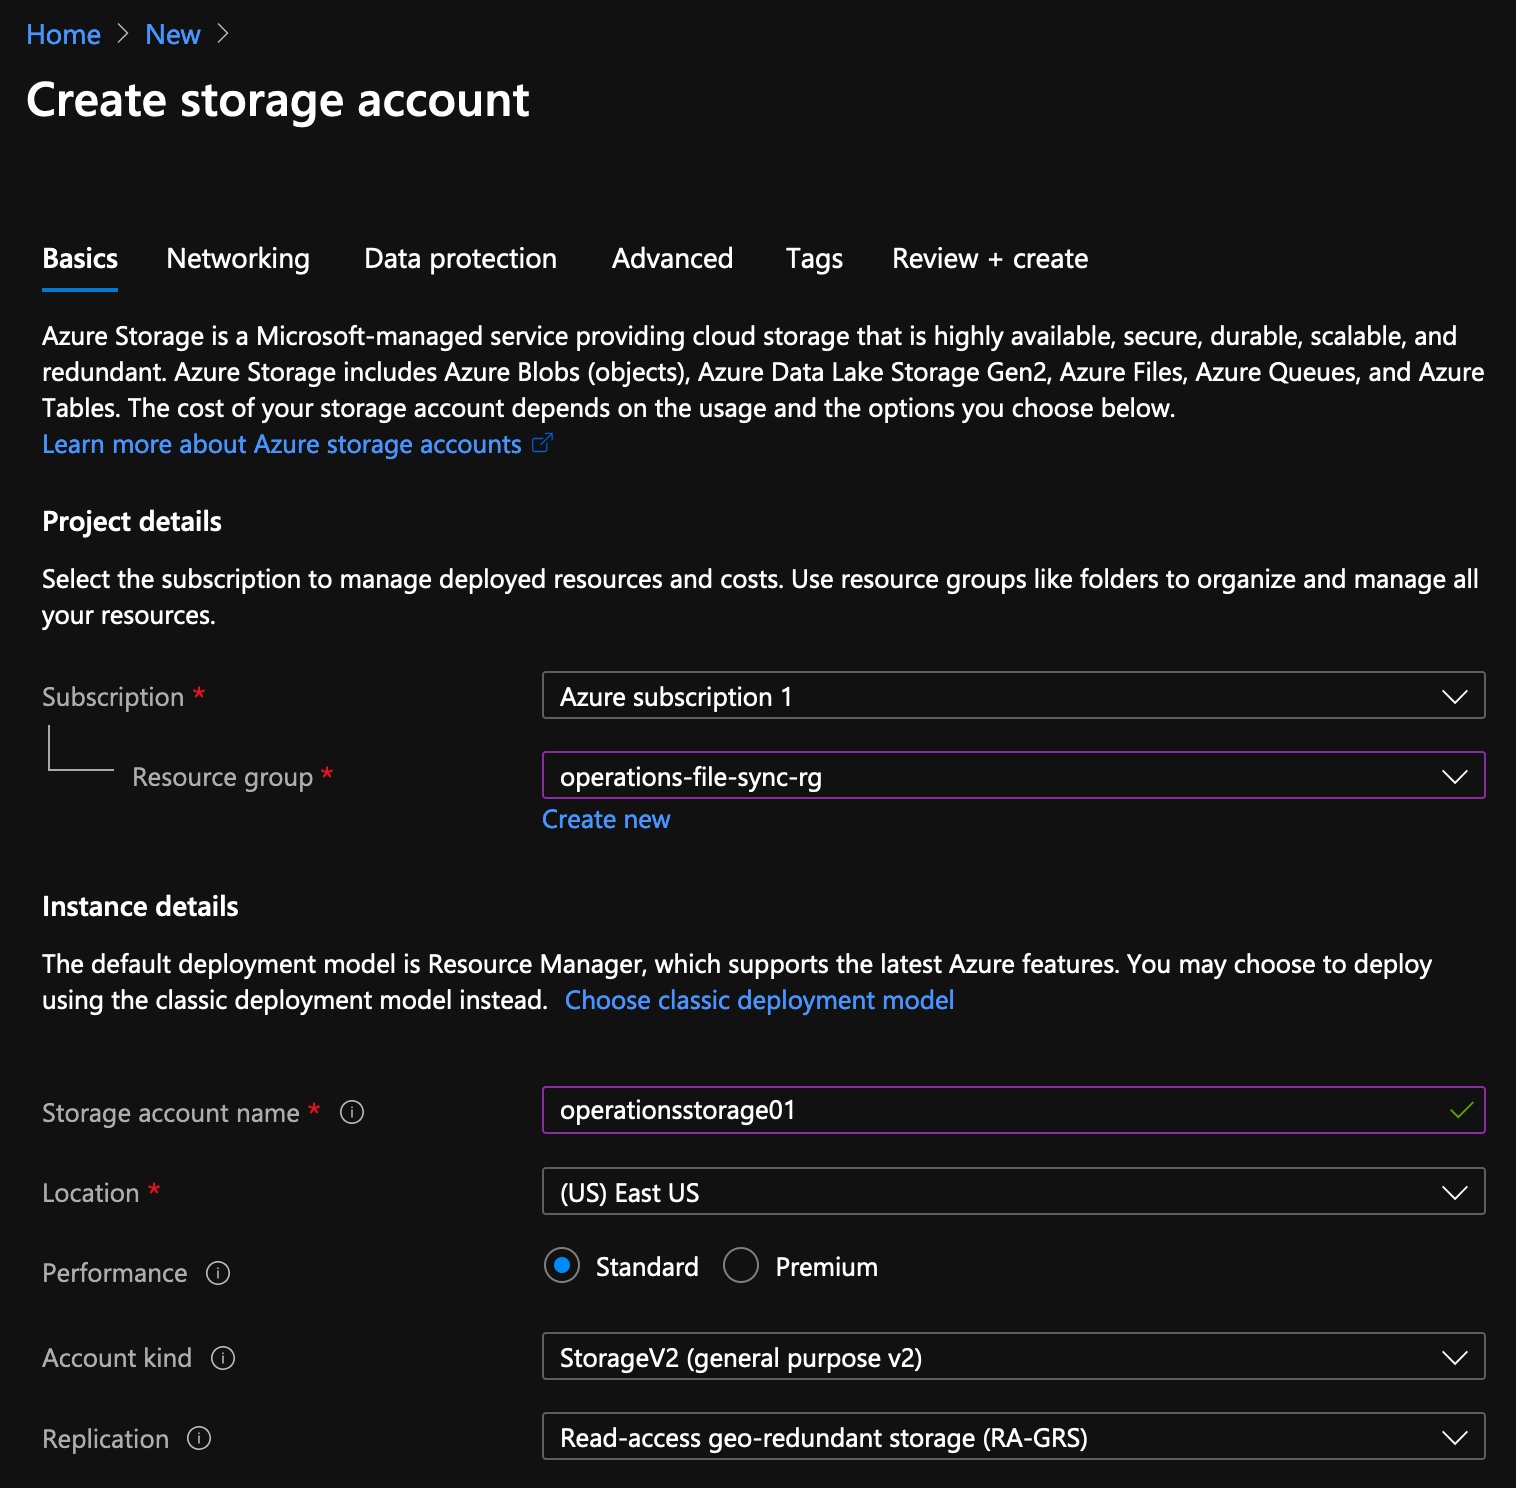
To create the Storage Account, complete the following steps:
- Login to the azure portal.
- Search for Storage accounts.
- Select add.
- Choose your resource group and storage account name.
- Accept defaults for the rest of the values.
- Select Review + create and then select Create.
Create the File Share
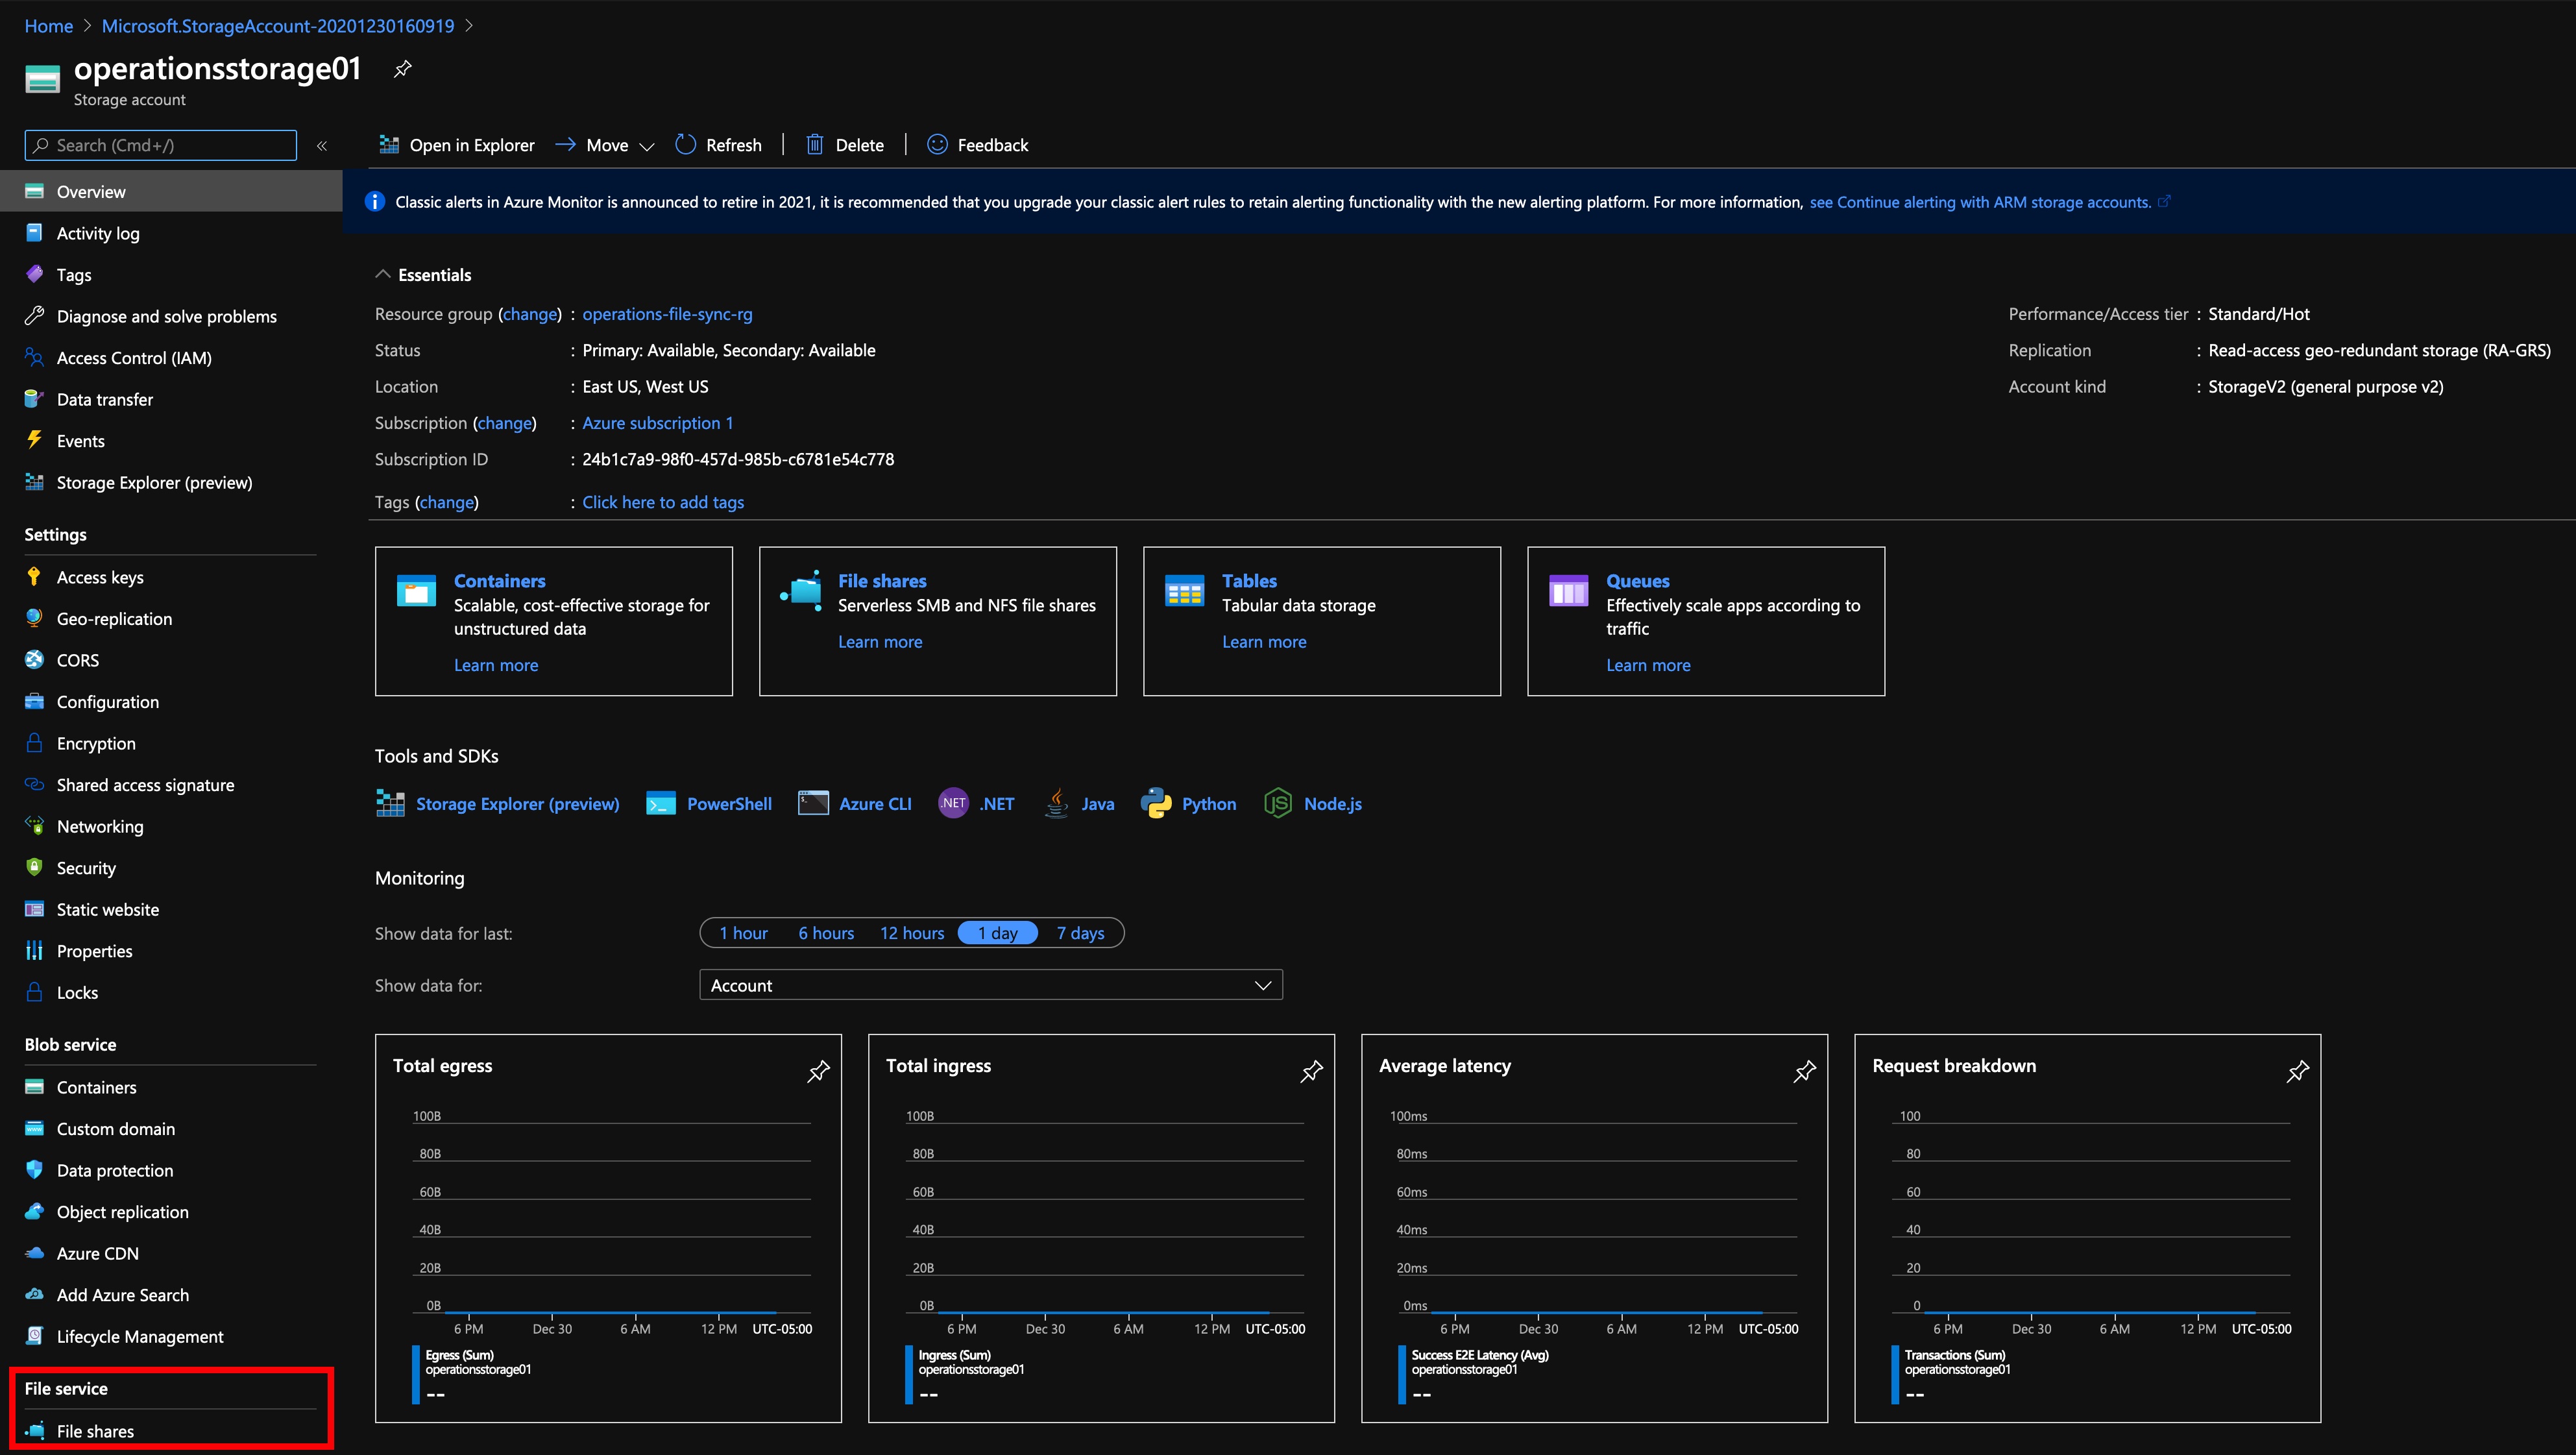
To create the File Share, complete the following steps:
- Wait for the storage account to be created.
- Once the resource is created, select Go to resource.
- Go to the Overview page.
- Select File Shares (bottom left hand corner of screenshot).
- Click add File Share.
- Choose the File Server name
- Select your quota
- For Tiers, choose either Transaction optimized, Hot, or Cold
- Select Create.
Create the Storage Sync Service
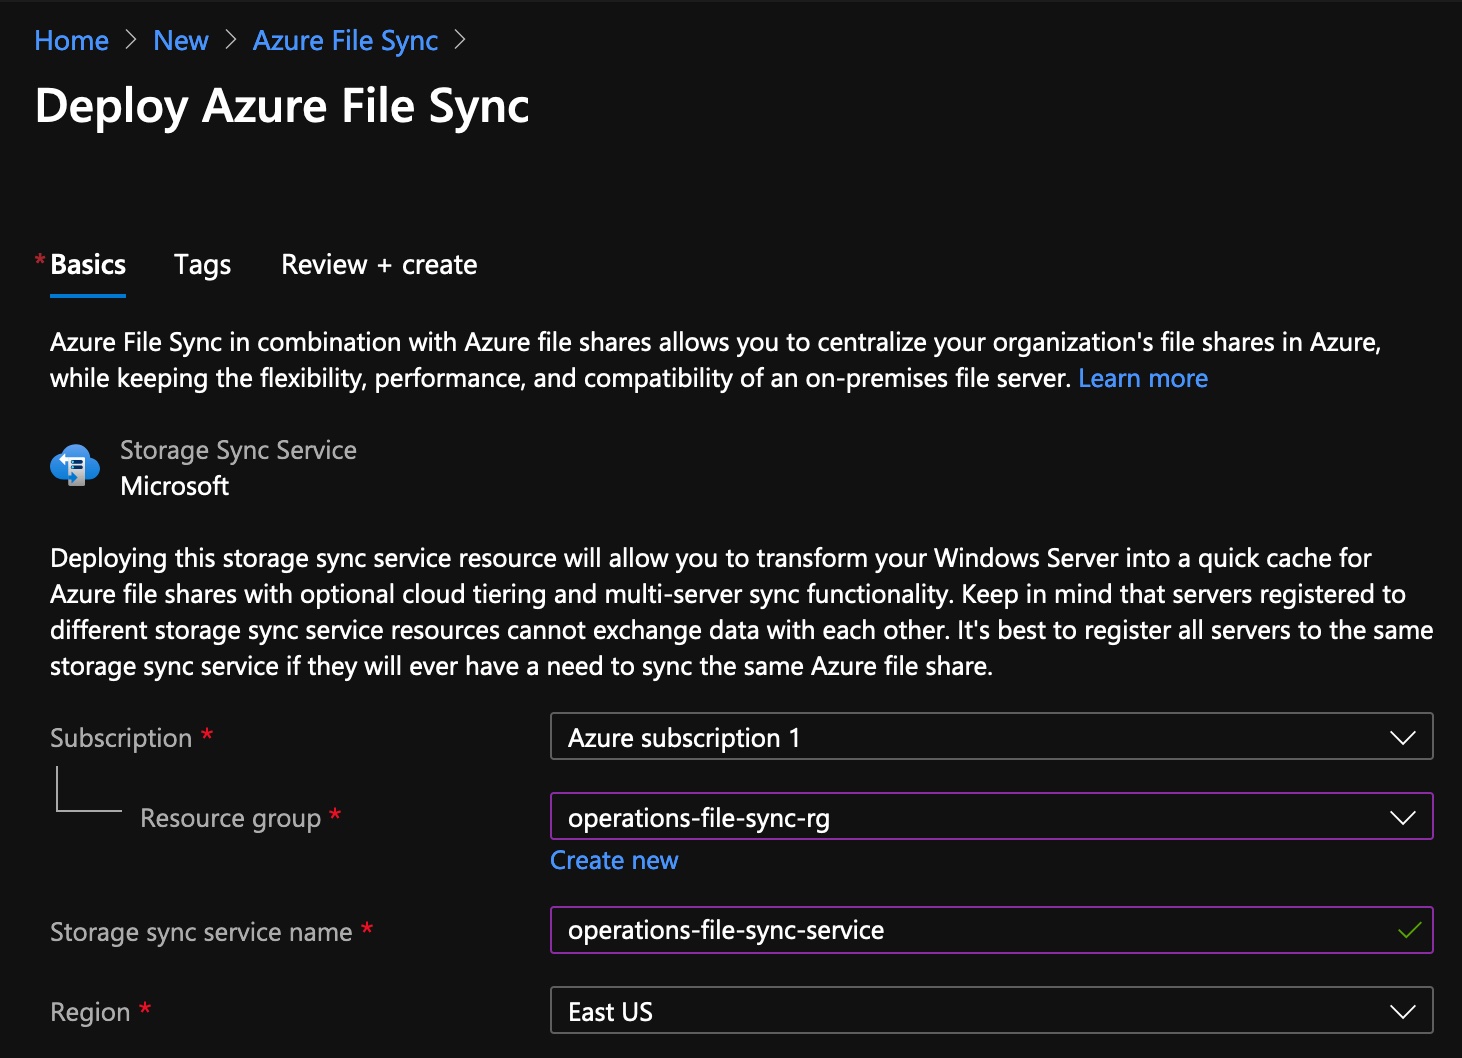
To create the Storage Sync Service, complete the following steps:
- In the top left-hand corner of the Azure portal, click Create a resource.
- Search for Azure File sync in the search box and select it.
- Select Create.
- Enter the same resource group and choose an appropriate name.
- Select Review + create and then select Create.
Create the Sync Group
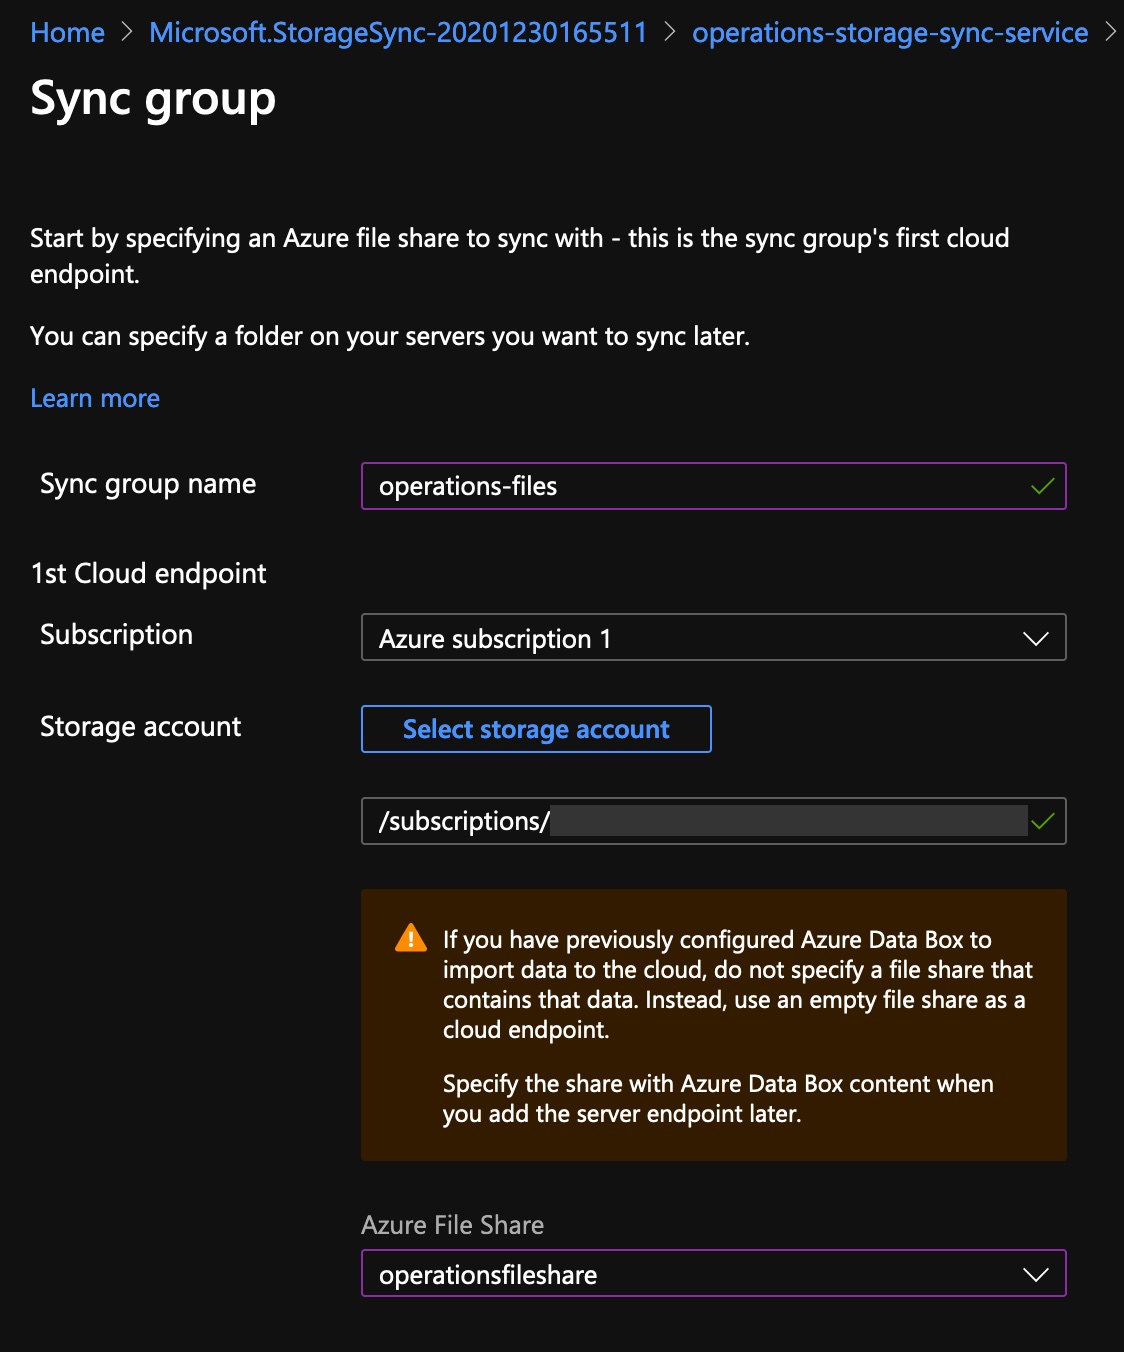
Complete the following steps to create the Sync Group.
- Once the Storage Sync Service is complete, select Go to resource.
- In the Overview pain, select Sync groups.
- Select + Sync group.
- Enter an appropriate Sync group name.
- Choose the Storage account you created.
- Choose the Azure File Share you created.
- Select Create.
SETUP AZURE FILE SYNC ON WINDOWS SERVER(S): Install the Azure File Sync Agent.
Now that Azure File Sync is set up in the Azure portal, we will begin preparing Azure File Sync on our on-prem Windows Server. See below for an overview of steps needed to be completed for setting up Azure File Sync on Windows Server:
- Disable IE Enhance Security Configuration
- Install the Azure File Sync Agent
- Register the Azure File Sync Agent
- Add the server endpoint
Below I cover each of these steps in detail, from start to end.
Disable IE Enhanced Security Configuration
Complete the following steps to disable IE Enhanced Security Configuration from your Windows Server:
- In Windows Security, select More Choices -> Use a different account.
- Enter your username and password for the Windows Server.
- select Server Manager -> Local Server.
- In the Properties -> IE Enhanced Security Configuration, select On.
- Select Off for Administrators and Users.

Install the Azure File Sync Agent
Complete the following steps to Install the Azure File Sync Agent from your Windows Server:
- Open any web browser.
- Download the Azure File Sync agent by going to Microsoft Download Center page here
- Select Download.
- Choose StorageSyncAgent_WS2019.msi and select Next.
- Allow the pop-up and then select Run.
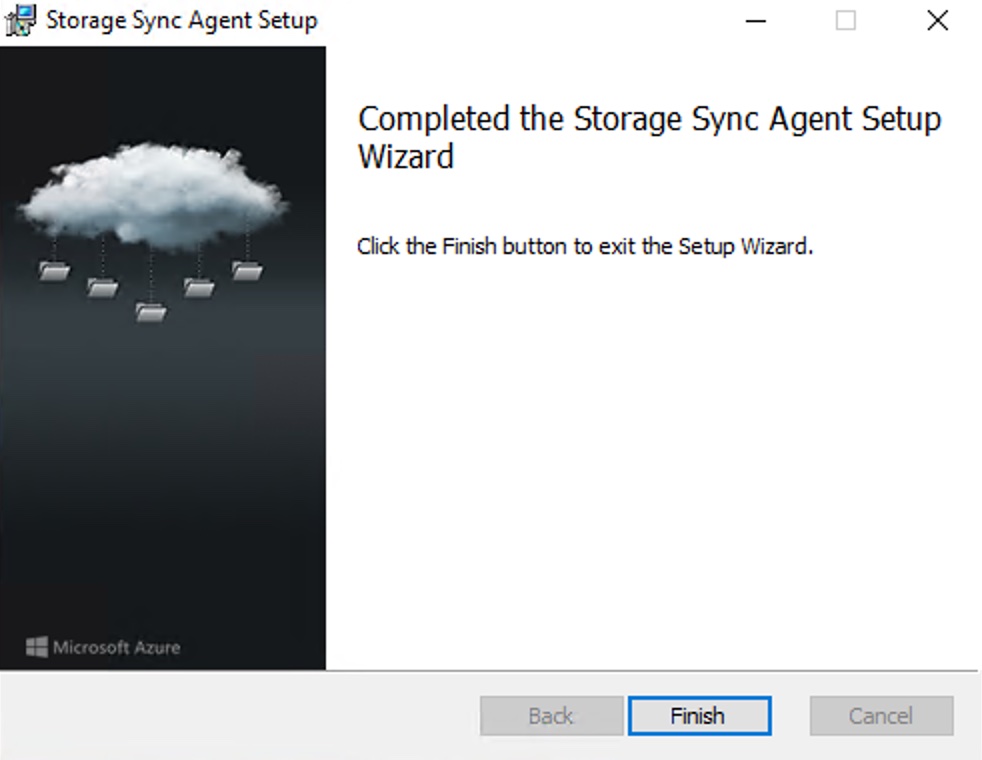
- Accept all defaults for the Storage Sync Agent Setup.
- Select the check box for Automatically update when the new version becomes available.
- Run any updates that are necessary and click Finish.
Register the Azure File Sync Agent
Complete the following steps to Register the Azure File Sync Agent from your Windows Server:
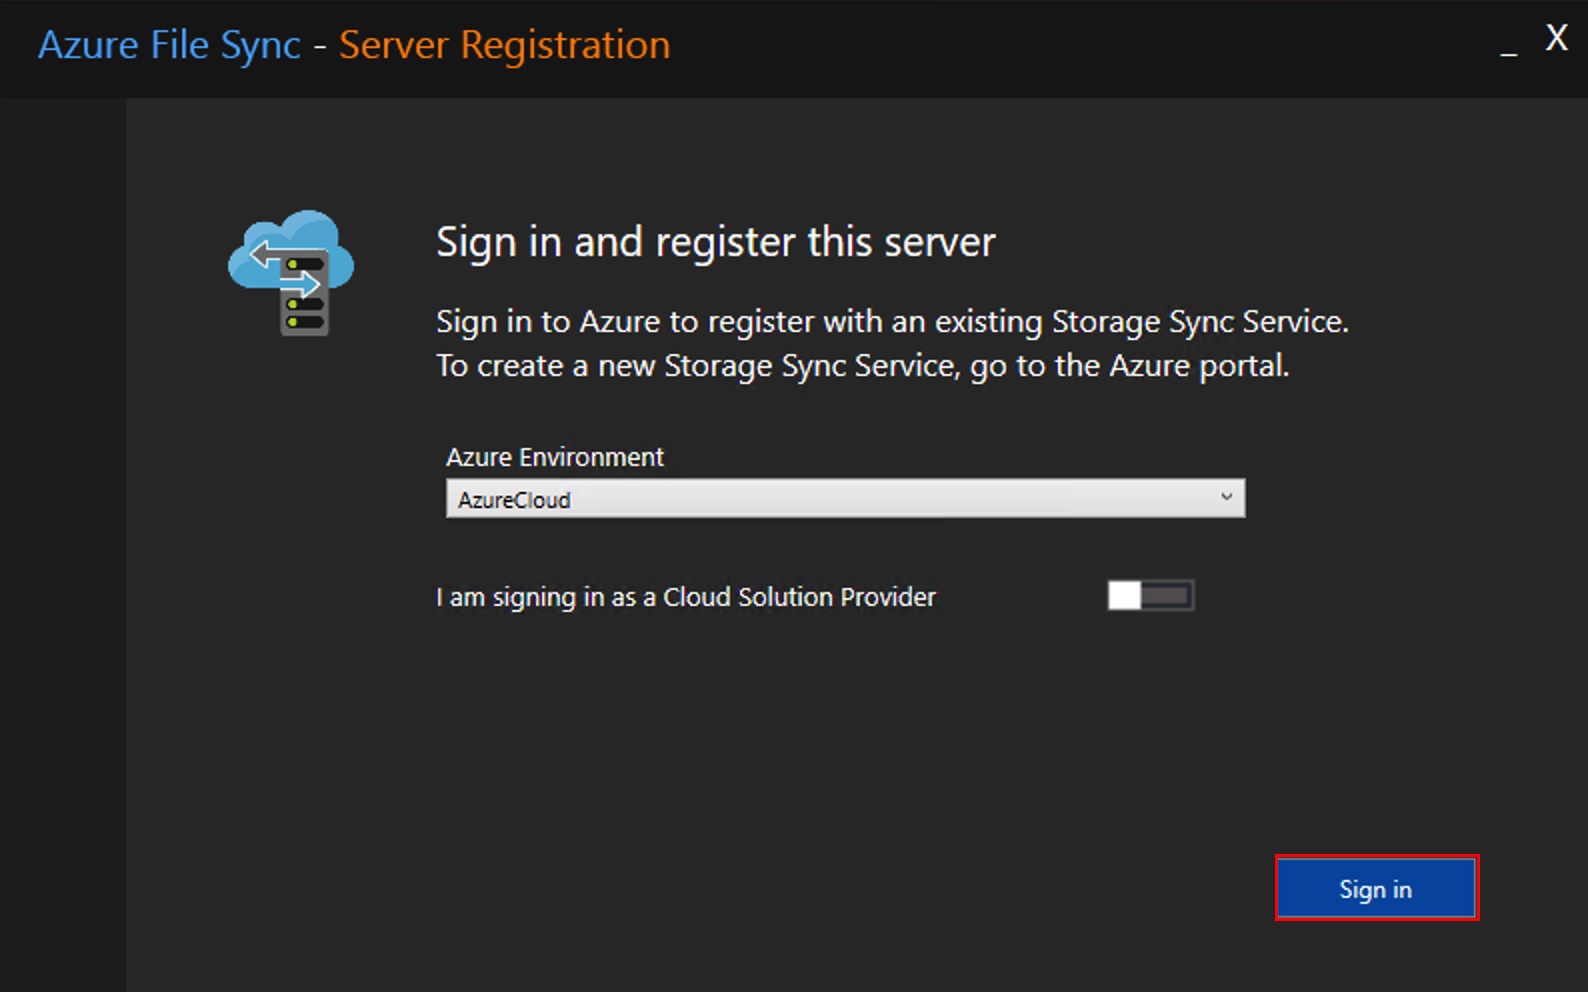
- Select Sign in on Azure File Sync - Server Registration and sign in using your Azure credentials.
- Enter the appropriate values for Subscription, Resource Group, and Storage Sync Service.
- Select Register.
- You should see Registration successful! Ensure the Network connectivity shows a status of Passed.
Add the Server Endpoint.
Complete the following steps to add the Server Endpoint in the Azure Portal:
- Go to the sync group you created.
- Select Add server end point.
- Select the Registered Server.
- Select the path you want to sync.
- Select Enabled for Cloud Tiering.
- Click Create.
Now that Azure File Sync is configured on our on-premise Windows Server and in our Azure Console, we can verify file transfer is occurring.
VERIFY AZURE FILE SYNC
Complete the following steps to verify Azure File Sync:
- Copy the Storage Account access key from under Settings in the Azure Portal.
- From the on-premise server, open File Explorer.
- Click This PC.
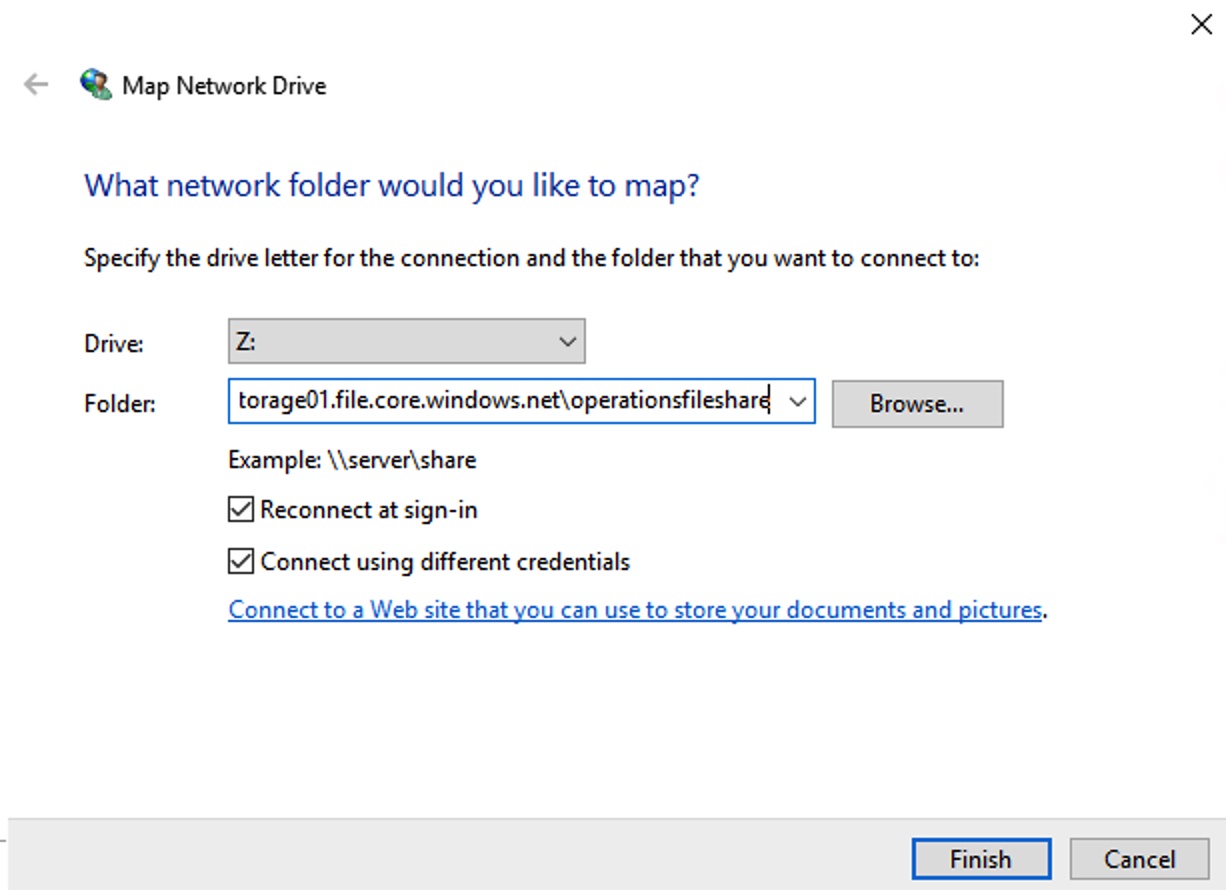
- Select Map Network Drive.
- In the Folder box, enter \\storageaccount.file.core.windows.net\fileshare.
- Select Connect using different credentials.
- Select Finish.
- For the username, enter AZURE\thenameofyourstorageaccount.
- For the password, paste your Access key.
- Select OK.
- Go to the Mapped drive and find a specific path you want to test.
- Create a folder in Documents called Confidential and to be sure, create a test document in this folder called daily-media-upload.
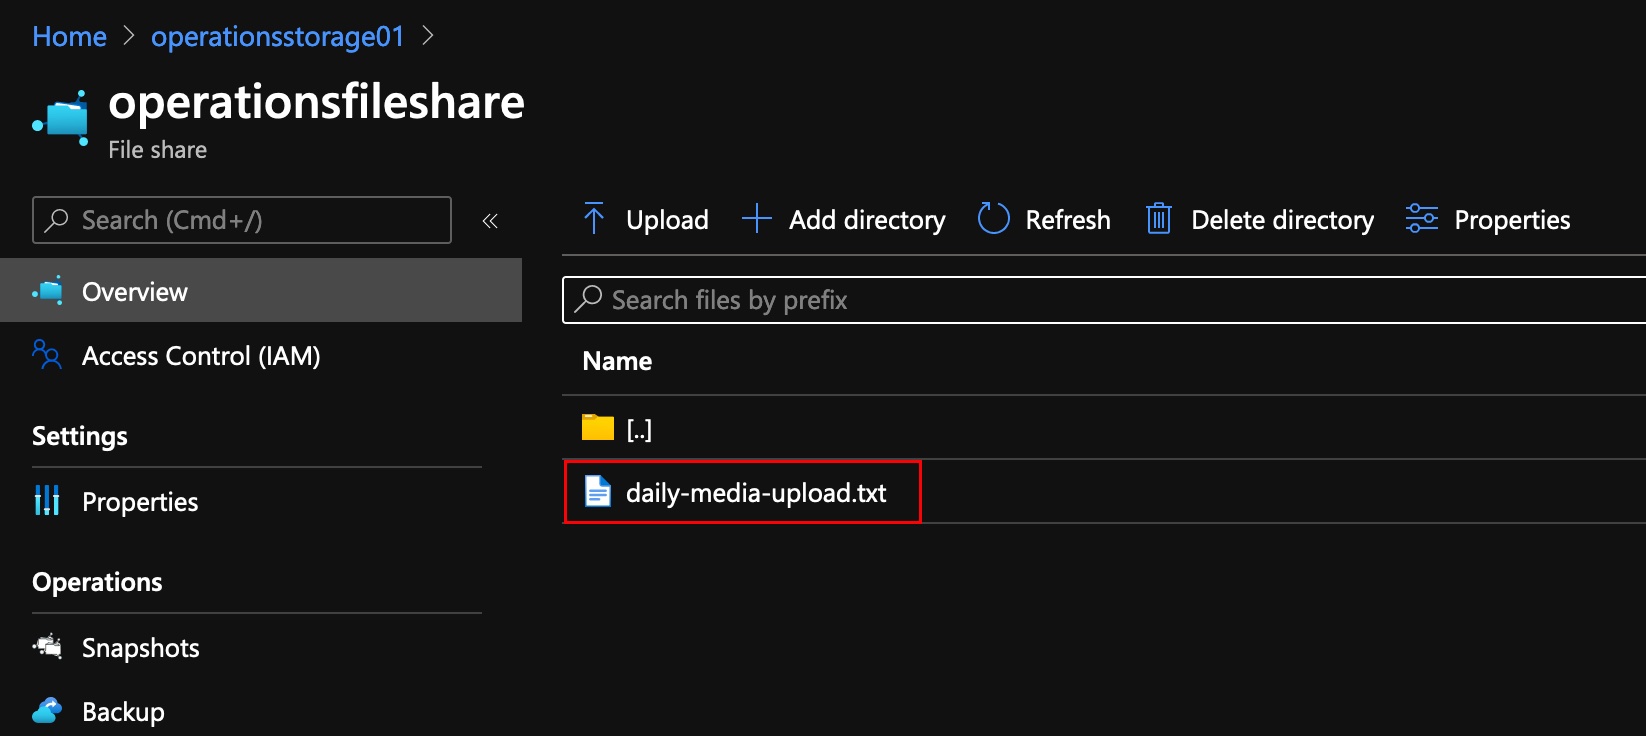
- Back in the Azure Portal, go to the same \Documents\Confidential path from the on-premise Windows Server.
- Click Refresh.
- Verify you see the daily-media-upload file.

SUMMARY
- The setup is straight forward.
- The local cache option provides a quick way for users to access files.
- You can choose between redundancy levels (i.e., locally, zonally, or geographically redundant).
- You can integrate Azure File Sync with snapshots and backup.
- You can restore individual items or entire shares.
If you have one or multiple on-premise servers, Azure File Sync could help you centralize your operations. It’s a simple as going through these steps and installing the Azure File Sync Agent on each on-premise Windows Server you wish to connect to Azure. Once your data is in Azure, you’ll also have the potential to benefit from Azure’s other features, like: security, redundancy, scheduled backups, and snapshots.